This is a sample tutorial on how to integrate a Ruby on Rails application with AWS S3 as an object storage.
Creating a new AWS Account
An Amazon Web Service account is required in order to use the Amazon S3 Storage service. If you already have an existing account, you can skip to the creation of the S3 bucket.
01: Sign-up for an AWS account. Create an account at https://portal.aws.amazon.com/billing/signup. This requires a credit card and an email address. Follow the procedure until the account has been created and verified.
02: Sign-in to the console. Login using the following URL, https://signin.aws.amazon.com/signin.
Note: In a production environment it is critical that the appropriate permissions has been design to only be accessible by proper users. An example would be that developers will not have access to the production environment. While a DevOps team would have access.
AWS S3
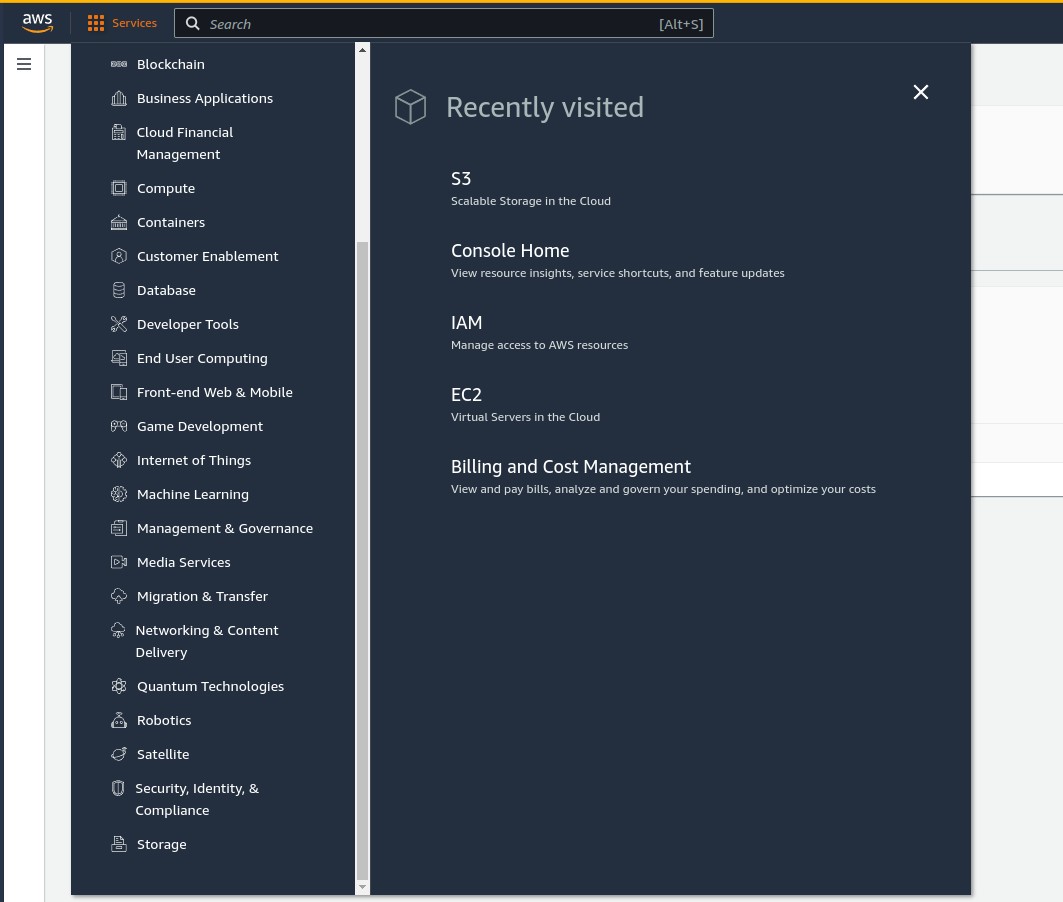
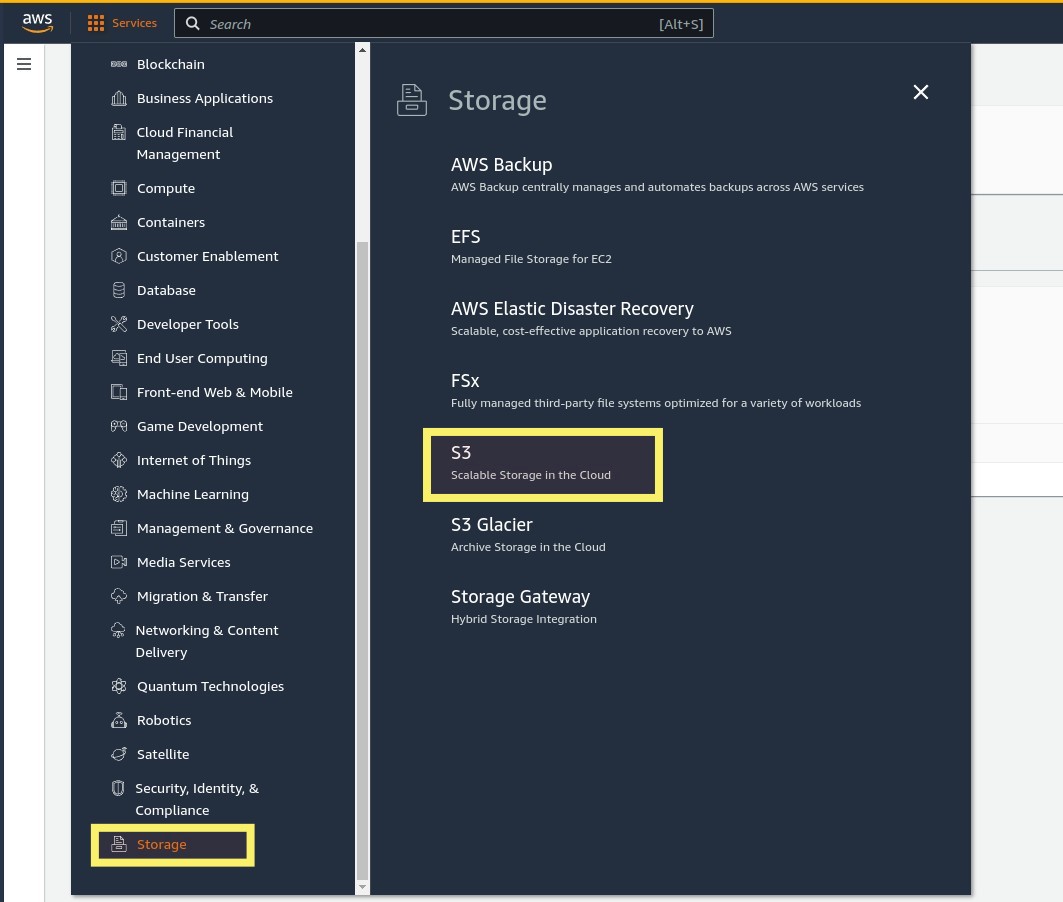
01: Create the S3 bucket. At the AWS console, select the Services link on the upper-right of the page. Then choose Storage. Select S3 from the list of services under Storage.
02: A list of menu and all the buckets associated with the account will be displayed. Click on the “Create Bucket” button on the right side.
03: In the create bucket page, you will be required to enter the AWS region and bucket name, which are the only required settings we need to change for this example.
Note: Bucket names are globally unique. This means if another account has already created a bucket with that name, you will not be able to create it.
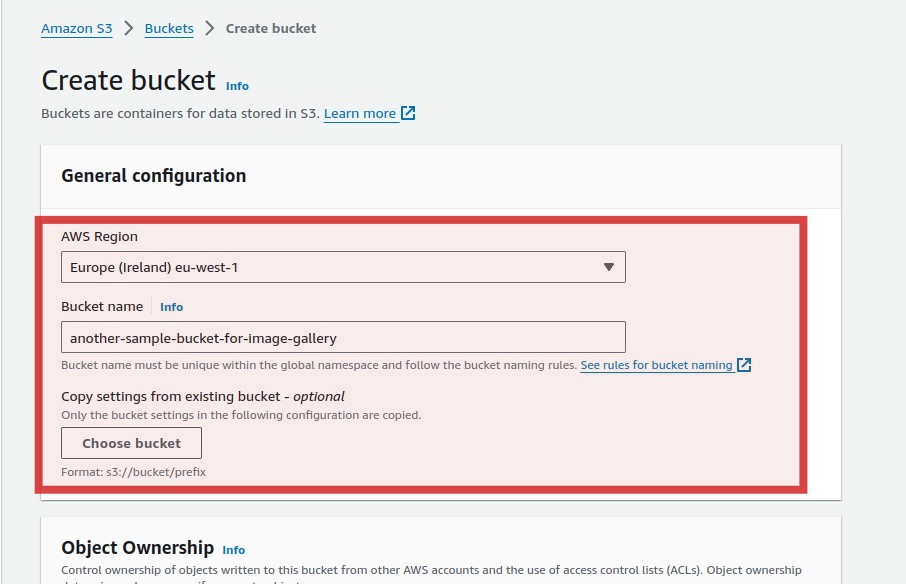
The above details are only used for the development environment. You might need to change this to another bucket name. In this example, we set the AWS region to Europe (Ireland) eu-west-1 and “another-sample-bucket-for-image-gallery”. It is named like this to make it unique and not interfere with a future production environment.
Take note of this, as this will be used later when configuring the code to access the S3 bucket.
Click the “Create bucket” button on the bottom to save the details.

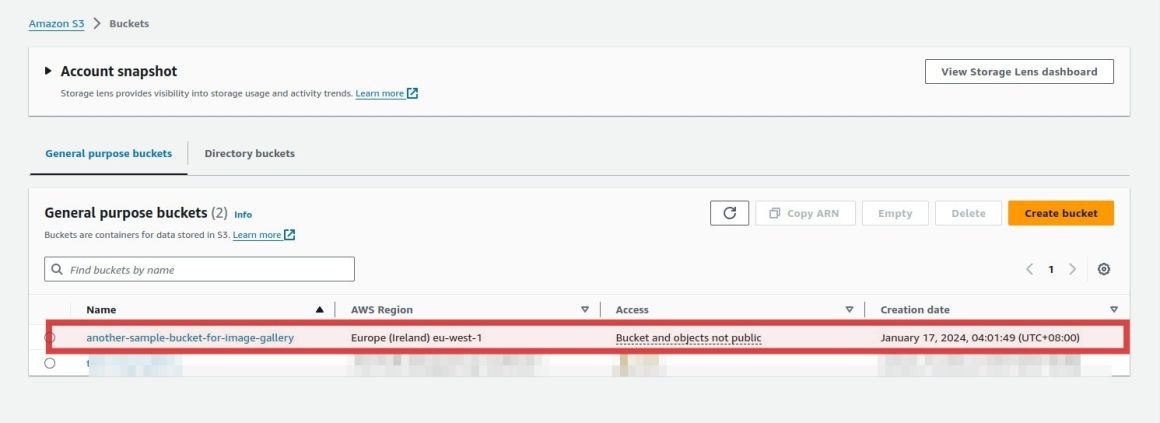
04: The newly created bucket will now be visible in the list. Notice that “Access” for this bucket is set to “Bucket and objects not public”. This means that the images will not be publicly visible.
IAM Account
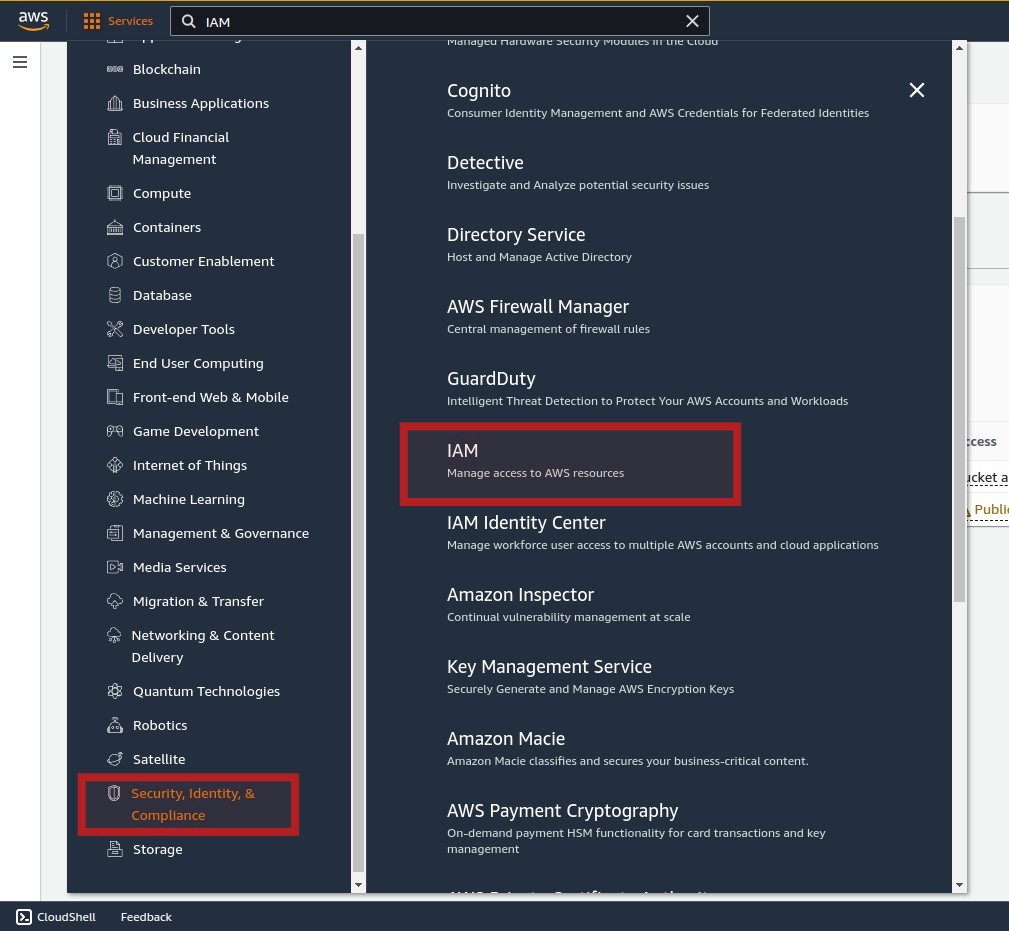
01: In order for our application/code to be able to access the S3 bucket we will need to create an IAM account. Click the “Services” link in the upper-left, then choose “Security, Identity & Compliance”, from the list select “IAM”.
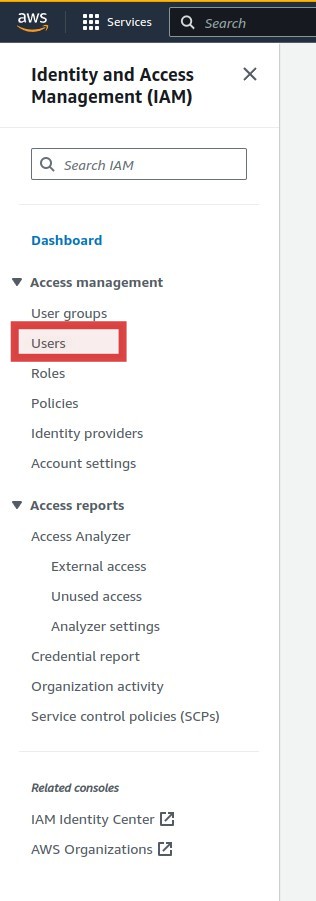
02: We will need to create an IAM user. Select “Users” from the menu on the left side.
03: A list of existing users will be listed or it could be empty if this is your first time to add a new user. Click on the “Create user” on the upper right hand corner of the page.

04: Set the name of the IAM. In this example, we will name it “web-s3-developer”. Click on the “Next” button.
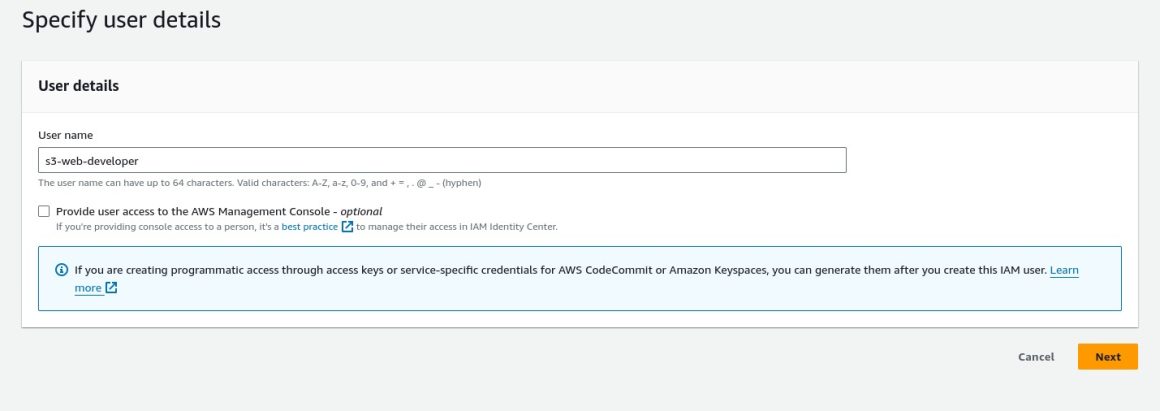
Note: Naming conventions are important not just in code but also in AWS resources. As the number of services grow, it is imperative that names should not just be easily recognizable but also with meaning. It might be easy to find the resource you are looking for at the start, but when you are managing more resources, having a quick glance of things and see its function saves effort and time.
05: Select the option “Attach policies directly”. As mentioned, it is best to attach a policy to a “group” instead of a “user“. But for demonstration purpose we will be setting it to a “user”.

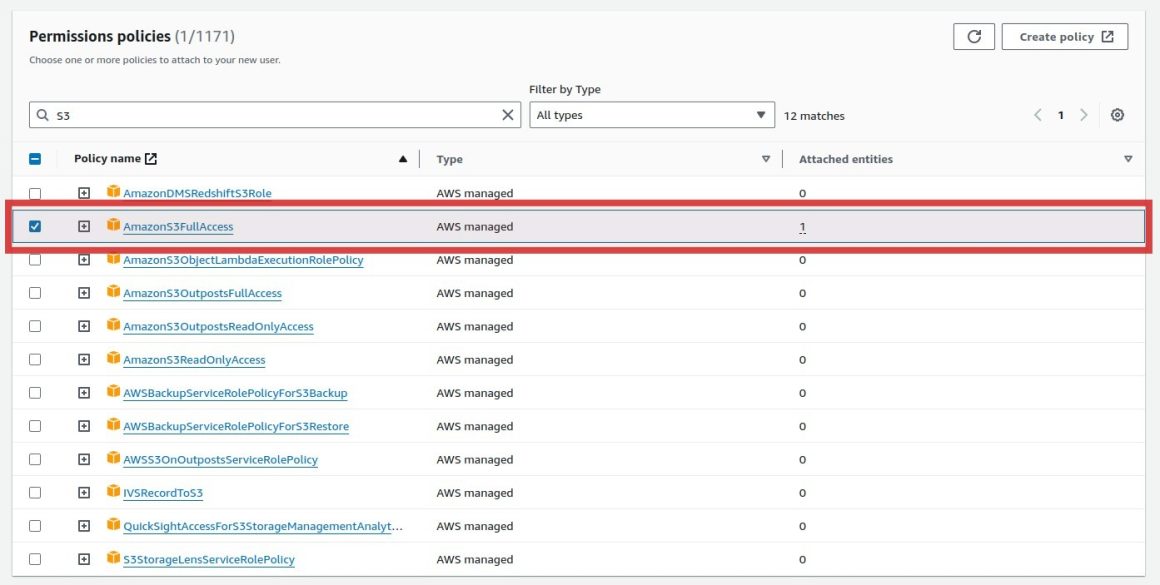
06: On the “Permission policy” section, search for “S3” in the search bar, by typing it and pressing enter on the keyboard. It will filter the Policies. What we are interested in now is “AmazonS3FullAccess”. Select it, then select the “Next” button on the bottom.
07: Review the details and click on the “Create user” button.
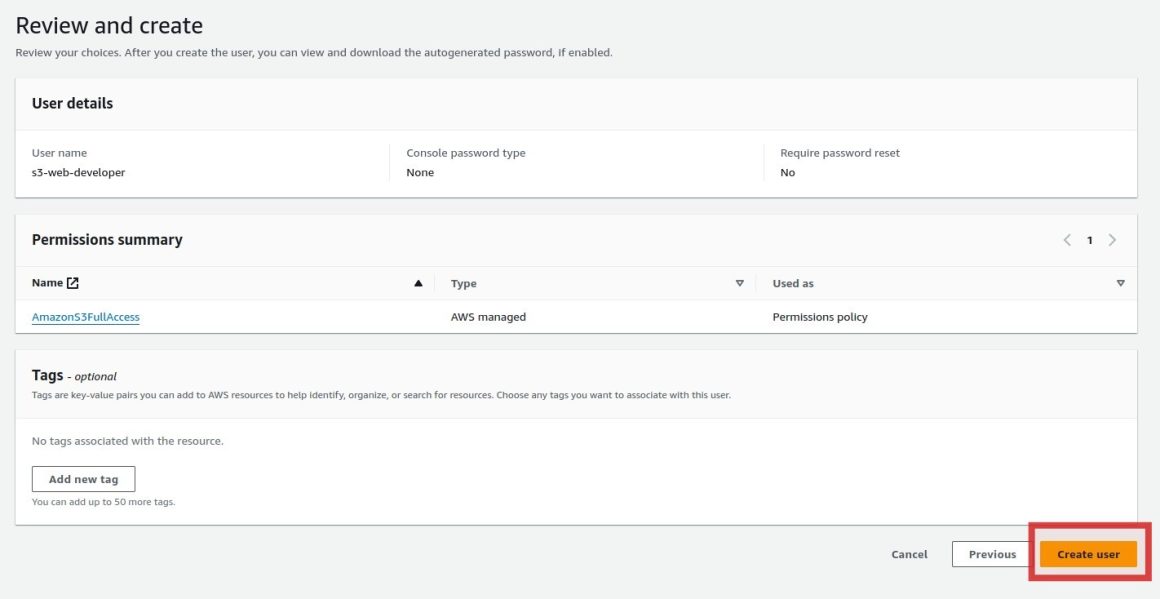
08: The new user should now be visible. Select it, as we will now be creating the keys required by our application.

09: Click on the link “Create access key”.

10. Select the “Use case” for the access key. Depending on the use case, different actions can be taken. For this example since we are using the keys outside of AWS, we will choose the option, “Application running outside AWS”. Then click “Next”
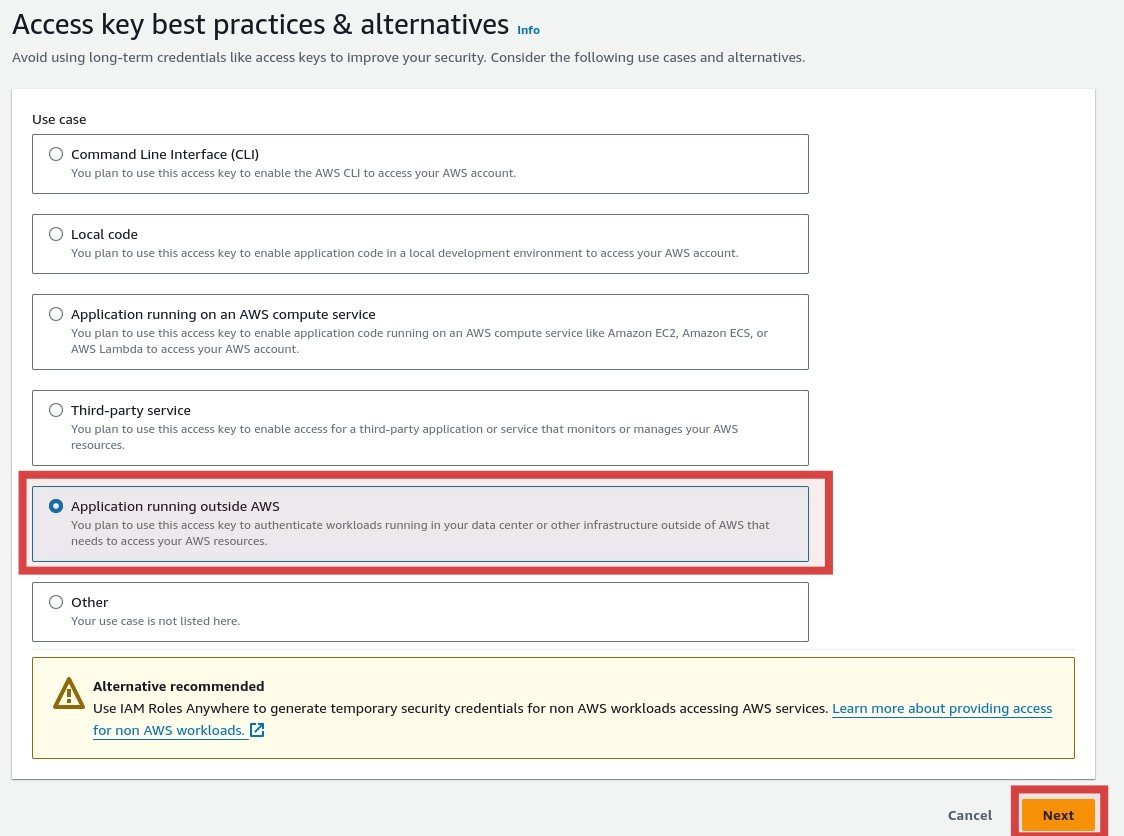
11. Set a description tag. Make it as descriptive as possible, in this example, “image-gallery-s3-developer-access-key”.
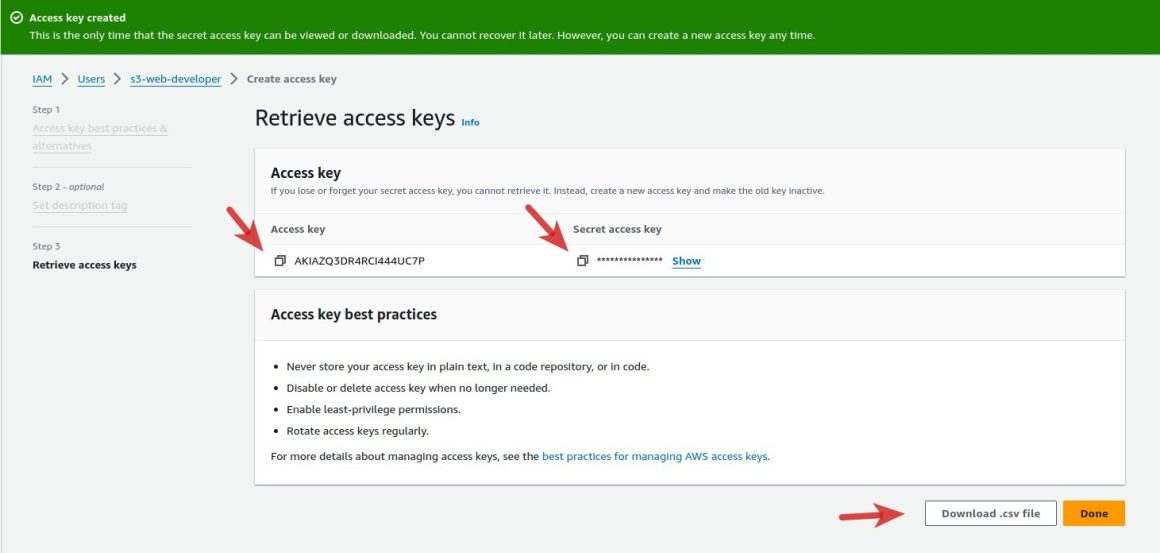
12. A summary will be shown. Displaying the access key and a hidden secret key. It is important to save this information for safe keeping. As this is the only time the secret access key will be visible. We recommend saving the “CSV” file using the “Download the .csv file”
The “Access Key” and “Secret access key” will be used by the application/code to perform S3 operations.
Note: A key vault is recommended for keeping the secret safe.
Installing the required software
Note that the following software is required for the React web application and Ruby on Rails API. If you are interested in only the React part, then the Ruby and Rails steps does not need to be executed.
Ubuntu
Execute the following step and commands to install the required softwares.
System update and required system libraries
sudo apt update
sudo apt upgrade -y
sudo apt-get install git-core zlib1g-dev build-essential libssl-dev libreadline-dev libyaml-dev libsqlite3-dev sqlite3 libxml2-dev libxslt1-dev libcurl4-openssl-dev software-properties-common libffi-dev
ASDF
Is a version management tool. Which can be used to manage softwares like Ruby and Node.
cd
git clone https://github.com/excid3/asdf.git ~/.asdf
echo '. "$HOME/.asdf/asdf.sh"' >> ~/.bashrc
echo '. "$HOME/.asdf/completions/asdf.bash"' >> ~/.bashrc
echo 'legacy_version_file = yes' >> ~/.asdfrc
echo 'export EDITOR="code --wait"' >> ~/.bashrc
exec $SHELL
Ruby
Note: This process takes some time to be completed.
asdf plugin add ruby
asdf install ruby 3.3.0asdf global ruby 3.3.0
# Update to the latest Rubygems versiongem update --system
Verify that ruby is installed by checking where it is located and the version installed.
which ruby#=> /home/username/.asdf/shims/ruby
ruby -v#=> 3.3.0
NodeJS
asdf plugin add nodejs
asdf install nodejs 20.10.0asdf global nodejs 20.10.0
# Install yarn for Rails jsbundling/cssbundling or webpackernpm install -g yarn
Verify that Node has been installed by checking where it is located and the installed version.
which node
node -v
Rails
gem install rails -v 7.1.2
Check the version installed
rails -v
Mac
Open a terminal and run the following steps.
Homebrew
/bin/bash -c "$(curl -fsSL https://raw.githubusercontent.com/Homebrew/install/HEAD/install.sh)"
ASDF
Is a version management tool. Which can be used to manage softwares like Ruby and Node.
cd
git clone https://github.com/excid3/asdf.git ~/.asdf
echo '. "$HOME/.asdf/asdf.sh"' >> ~/.zshrc
echo '. "$HOME/.asdf/completions/asdf.bash"' >> ~/.zshrc
echo 'legacy_version_file = yes' >> ~/.asdfrc
exec $SHELL
Ruby
Note: This process takes some time to be completed.
asdf plugin add ruby
asdf install ruby 3.3.0asdf global ruby 3.3.0

# Update to the latest Rubygems version
gem update --system
NodeJS
asdf plugin add nodejs
asdf install nodejs 20.10.0asdf global nodejs 20.10.0

# Install yarn for Rails jsbundling/cssbundling or webpacker
npm install -g yarn
Verify that Node has been installed by checking where it is located and the installed version.
which node
node -v
Rails
gem install rails -v 7.1.2
Check the version installed
rails -v
Windows
To run the necessary software, they can be run by installing a Linux subsystem in the Windows environment.
On a power shell run the following commands.
01: Create a new project using the rails command
wsl --install -d Ubuntu
02: Reboot the computer after the installation.
03: Follow the instructions from the Ubuntu steps.
System update and required system libraries
sudo apt update
sudo apt upgrade -y
sudo apt-get install git-core zlib1g-dev build-essential libssl-dev libreadline-dev libyaml-dev libsqlite3-dev sqlite3 libxml2-dev libxslt1-dev libcurl4-openssl-dev software-properties-common libffi-dev
ASDF
Is a version management tool. Which can be used to manage softwares like Ruby and Node.
cd
git clone https://github.com/excid3/asdf.git ~/.asdf
echo '. "$HOME/.asdf/asdf.sh"' >> ~/.bashrc
echo '. "$HOME/.asdf/completions/asdf.bash"' >> ~/.bashrc
echo 'legacy_version_file = yes' >> ~/.asdfrc
echo 'export EDITOR="code --wait"' >> ~/.bashrc
exec $SHELL
Ruby
Note: This process takes some time to be completed.
asdf plugin add ruby
asdf install ruby 3.3.0asdf global ruby 3.3.0

# Update to the latest Rubygems version
gem update --system
Verify that ruby is installed by checking where it is located and the version installed.
which ruby#=> /home/username/.asdf/shims/ruby
ruby -v#=> 3.3.0
NodeJS
asdf plugin add nodejs
asdf install nodejs 20.10.0asdf global nodejs 20.10.0

# Install yarn for Rails jsbundling/cssbundling or webpacker
npm install -g yarn
Verify that Node has been installed by checking where it is located and the installed version.
which node
node -v
Rails
gem install rails -v 7.1.2
Check the version installed
rails -v
Running the application
01: Clone the repository
git clone https://github.com/smithsvanguard/sv-2024-01-gallery
02: Navigate to the application directory
cd sv-2024-01-gallery
03: Update the configuration of the AWS credentials. Edit the development.rb file. Note this file is for development or local purpose only. For production environment, there is a corresponding production.rb. It is also advisable to use a keystore for the credentials.
nano config/environments/development.rb
04: Set the AWS credentials at the bottom section
config.active_storage.service_configurations = {
    amazon: {
      service: 'S3',
      access_key_id: '',
      secret_access_key: '',
      region: '',
      bucket: ''
    }
  }
05: Next is to install the required libraries or Gems
bundle install --gemfile Gemfile
06: Then migrate the database
rails db:migrate
07: Run the application
rails server -p 3001
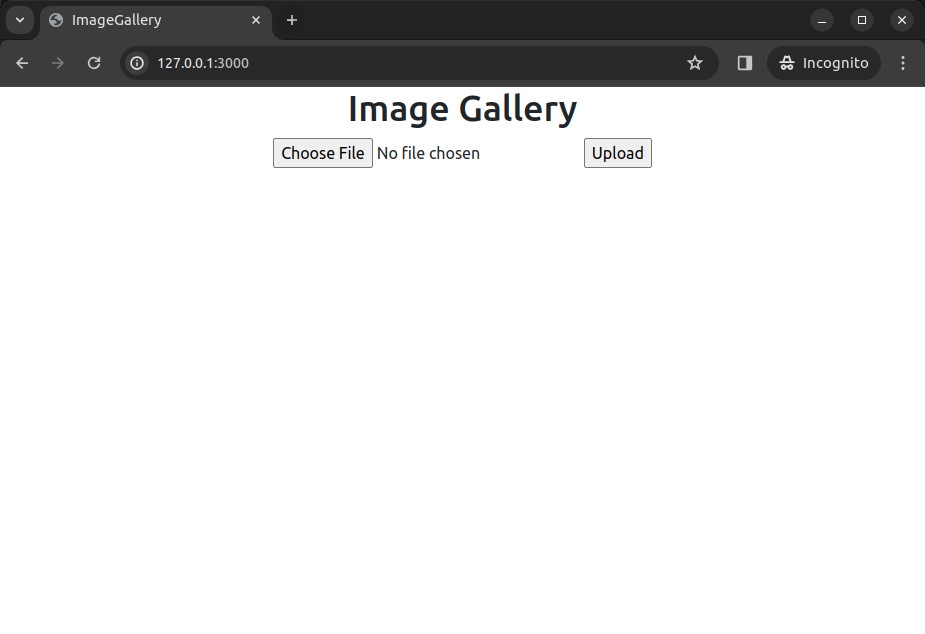
08: Select an image to upload, and click the “Upload” button. It will redirect to the details page once successful
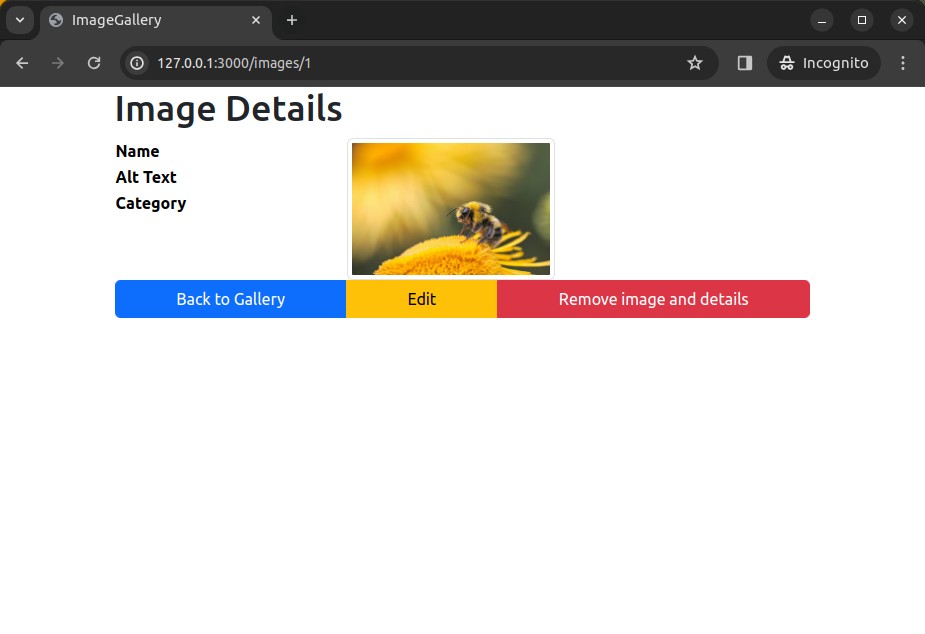
09: Select the “Edit” button in the middle to set additional information. Then click on the
“Save” button.
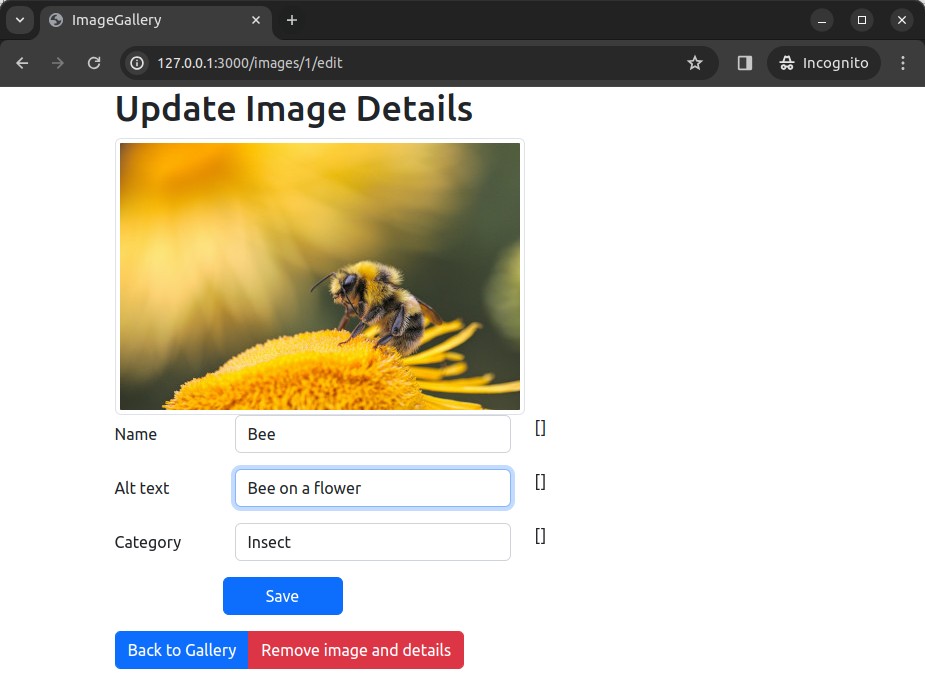
10: The “Name”, “Alt text” and “Category” will now be reflected on the details page.
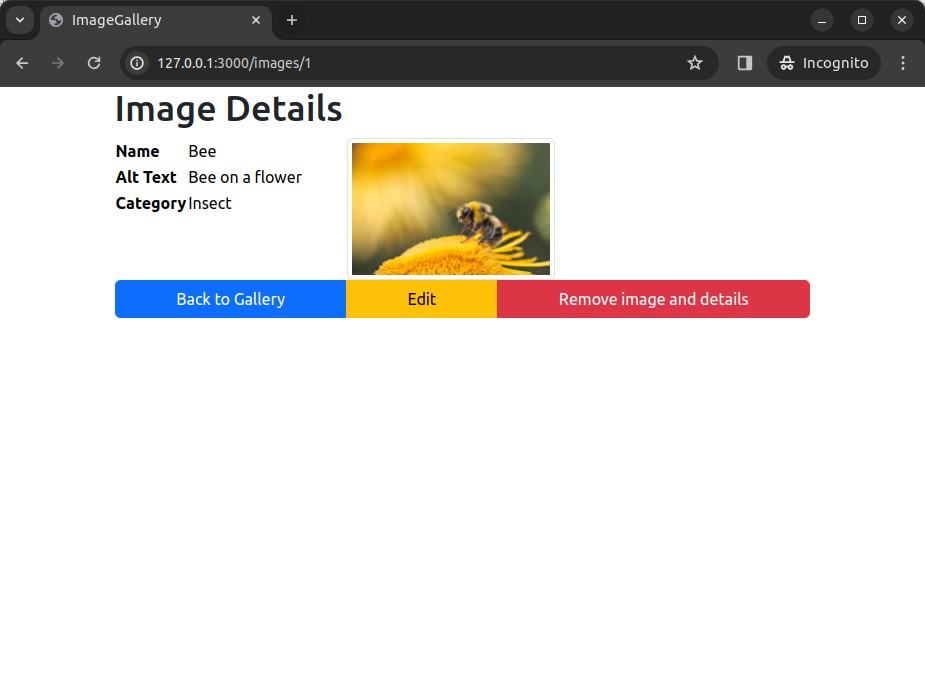
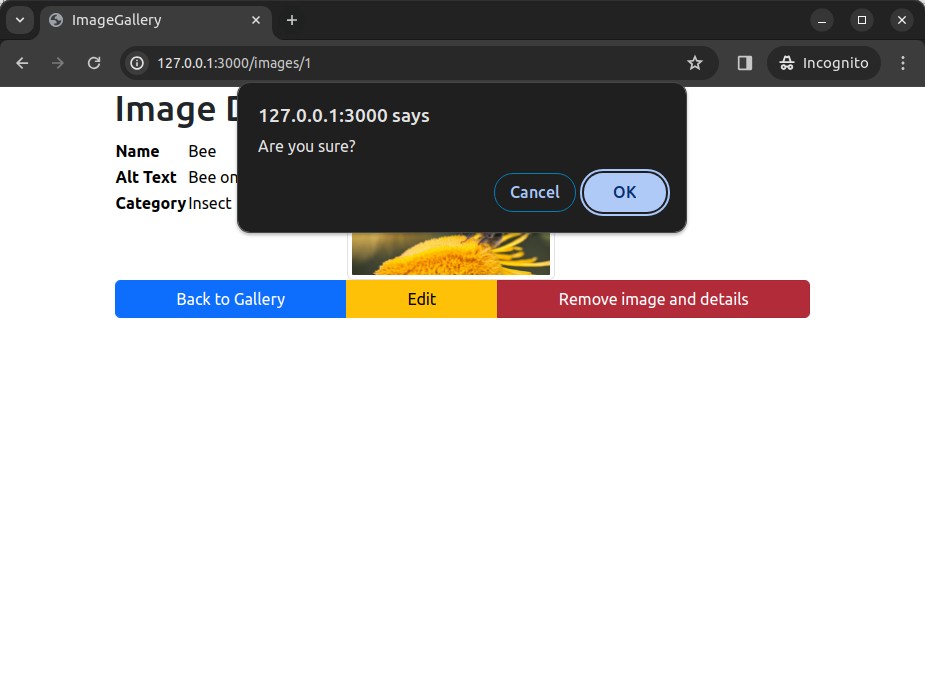
11: Delete the image by using the “Remove image and details” button. A confirmation message will be displayed.
Congratulations. That is an example on how to integrate to AWS S3 objects with a Ruby on Rails application.


